
Almost immediately after moving into our new home in Nashville (it’s been a whole year if you can believe it!) we began putting together plans for a full kitchen renovation. The dated kitchen was actually one of the things that drew us most to our house. Right away we saw SO much potential for a bright airy open floor plan with a new standalone island, bar seating and updated appliances.
before

Our house was built in the early 2000s when the Tuscan-style kitchen trend was popular thus the cherry red cabinets, dark stained hardwood floors and alllll the beige tile. Needless to say it wasn’t our vibe. I also wasn’t a fan of the angled double-height island. It completely cut off the kitchen from the rest of the downstairs and was oddly tall. I’m nearly 5’6″ and would have to stand on my tip toes at the sink to watch Nate playing in the living room. The bar counter was so high that I would’ve never felt comfortable letting small children sit there on bar stools. It was a big safety concern for us.


demo day

For some reason I expected demo to be a longer part of the process, but our team literally did it in one day! We removed everything– including the existing pantry closet to give more space to the laundry room. You’ll see in the final reveal photos that a new pantry cabinet was built where the fridge previously went. Following demo, the team spent a few days focusing on installing new plumping + electrical and moving existing lines for where our appliances and lighting would be placed. They also removed a bunch of unnecessary ceiling lights and outlets. It was a lot of tedious and internal work, but obviously very necessary!


our design plans

Other than moving the island placement, we fortunately didn’t have to make any other major layout or structural changes. To expand our kitchen we extended cabinetry down the entire length of the wall (cabinets previously stopped halfway and the wall opposite breakfast area had been bare.) The extra space allowed us to move the refrigerator to the same wall as our stove and microwave. We also increased our countertop space and now had room for an appliance garage to house our toaster oven and coffee maker, and a wet bar with a beverage fridge. ice machine and floating shelves. The dishwasher and sink would be placed in the island similar as before.
cabinet + hardware install
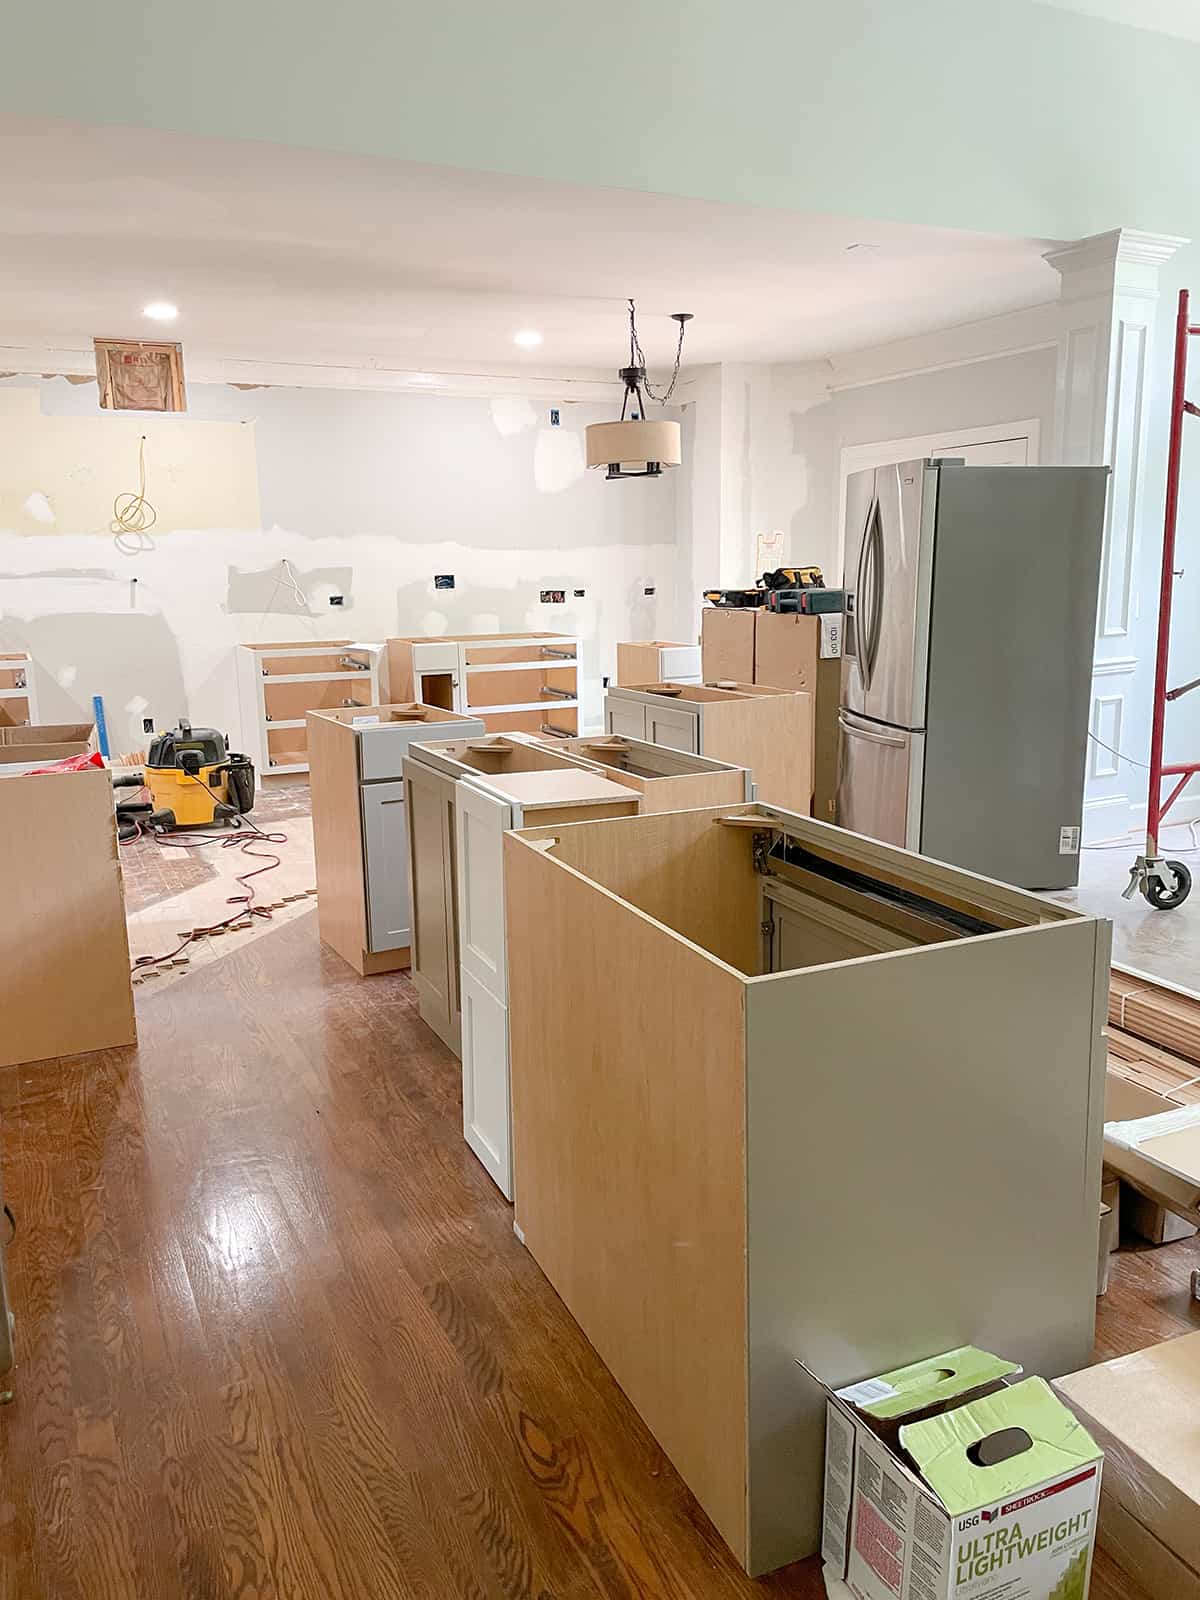
Cabinet install happened in two waves: bottoms + island first and then the uppers were done after the countertops were placed. The cabinet company we used actually handles installation, which was nice since they’re the experts and know their product best. This isn’t always the norm so depending on where you purchase your cabinets, you may have to have your contractor handle the install. We also ordered our cabinets pre-painted so all that had to be done in our home was the actual placement and adding hardware.
floor refinishing

Floor refinishing took a full week. Because we moved the island and had to interlace in new flooring to a few previous damaged areas, we had to refinish the entire room to ensure a matching look. And since the entire goal of our renovation was to create a seamless, open floor plan we decided to refinish our entire downstairs including our dining, living, master bedroom, hallways, etc. The final result turned out way better than I could have imagined!

countertops + island install

I feel like once our floors were finished that things really started to come together quickly. Hello new quartz countertops and waterfall island!


backsplash install + paint


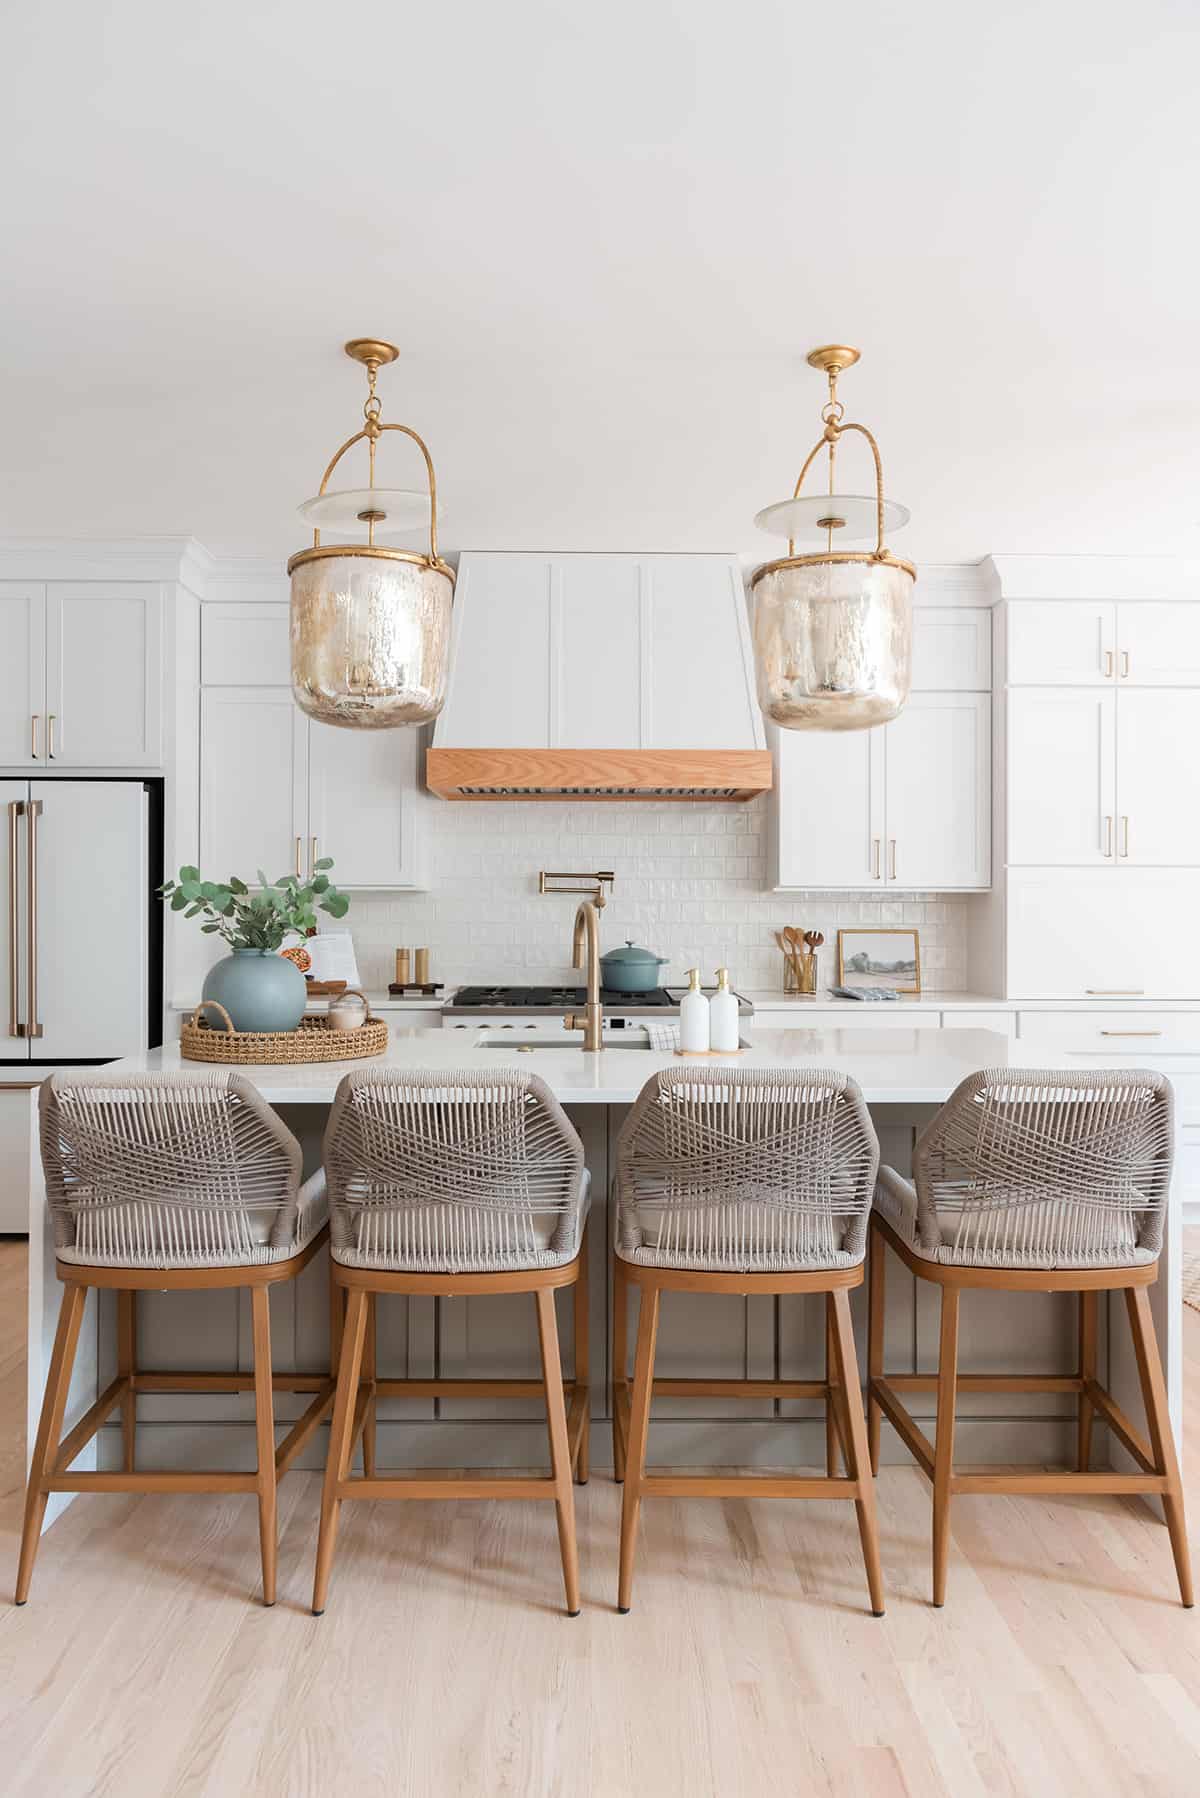
after!


kitchen renovation timeline
Being new homeowners and first time renovators in a brand new city we knew that we needed professional help. The first thing we did was enlist our interior designer Katie. Not only did she help us with design concepts and drawing up plans, but she completely project-managed our renovation from start-to-finish. This included setting up meetings/getting quotes from different contractors and from there helping us choose the right one for our project. She handled conversations and the ordering process with our cabinet maker and the slab yard where we purchased our countertops. She also did all of our product orders– light fixtures, hardware, furniture, tile, etc.
When our renovation officially got underway she and our contractor were in contact daily managing the schedule to make sure work was being completed on time. There is absolutely no way we could’ve ever juggled all of the logistics without help. If there’s one piece of advice I would give to anyone considering a large home renovation it’s to HIRE AN INTERIOR DESIGNER or have someone on your team that’s in charge of project management (some contractors/builders offer this service.)
August 2021- hire interior designer, discuss initial wants/needs of project
September 2021- design presentation, begin narrowing down design concept and scope of work
October 2021- get contractor bids, hire contractor, order all appliances/any products with long wait time
November/December 2021- finalize cabinet order, continue working through design concept
January/February 2022- we were originally planning to demo and begin renovating, but grew concerned over appliance wait times (still hadn’t gotten a firm ship date yet) and decided to push start date until the spring
March 2022- got word our appliances would be ready to ship mid-April and officially confirmed project start date
April 20 2022- demo day! renovation officially begins
May 2022- reno reno reno
June 2022- project was wrapped the first week of the month!
Week 1: demo + initial plumbing/electrical work
Week 2: cabinet install, appliance delivery
Week 3: hardwood floor refinishing, countertop install
Week 4 + 5: backsplash install, paint, more electrical + plumbing work, appliance install
Week 6: lighting install, final touchups
The project took a little over six weeks to complete. This is what our contractor and designer had told us to expect from the beginning, but I honestly didn’t believe them that it could be that quick and had mentally prepared myself for delays and a much longer process. Our contractor’s team was at our home on average 5-6 days per week working from 7:30AM to around 3/4PM. They even worked a few Saturdays and Sundays, which we were fine with since we wanted the project done as soon as possible. We renovated our living and laundry rooms at the same time (reveals to come soon!) and I fully believe that if we’d just done our kitchen it would’ve been finished in a month. Our team was FAST and so efficient.
where did you live during the renovation?
We decided to live in our home throughout the project with the exception of the week our downstairs floors were refinished. Thankfully our home is laid out in a way where we were able to keep a few spaces separated from most of the construction madness. Our contractor sectioned off our master suite and entire upstairs with protective plastic barriers, so those were the areas where we spent the most time during the project. We have a large upstairs loft where we were able to transition most of our downstairs furniture and create a makeshift living room. Was living in a renovation while pregnant with a toddler inconvenient? Yes of course, but honestly it wasn’t as uncomfortable or difficult as I expected.
what did you do without a working kitchen?
Since our dining room largely stayed untouched (other than some fresh paint at the end of the project) we ended up using it as a temporary kitchen. We basically just moved over our bare kitchen essentials and planned on making a lot of toaster oven meals + primarily using our garage fridge. We also ordered this little travel stove that worked great and a ton of disposable plates, silverware and cups. The hardest aspect of not having a working kitchen was definitely losing the sink and dishwasher. We had to wash everything by hand in either our powder room or laundry room sink (though we lost that for about two weeks when our laundry reno was happening). During our renovation we probably cooked/made easy toaster oven meals 3-4 days per week and then the rest of the week ordered takeout.

^^ our makeshift kitchen in the dining room
hardwood floor refinishing faq
That happened about mid-way through the project and we had made plans in advance to move into a nearby Airbnb. When you get hardwood floors refinished, obviously all furniture and items have to be moved elsewhere. Depending on what stain and sealant is used, you may not be able to walk and place items back on your floors for a certain period of time. There is also a lottttt of dust involved. Having a week staycation at an Airbnb was 100% the right decision and gave us a nice break from the construction madness.
PS we have red oak flooring. We sanded down the dark stain to the wood’s natural shade and then added a clear water-based finish.
kitchen renovation cost
Cabinetry, Custom Hood, Floating Shelves, Hardware + Installation: $31,000
Countertops + Installation: $7,500
Appliances: $27,000
Lighting + Accessories: $5,000
Labor: $50,000
Interior Design: $5,000
TOTAL: $125,500
ge cafe appliances
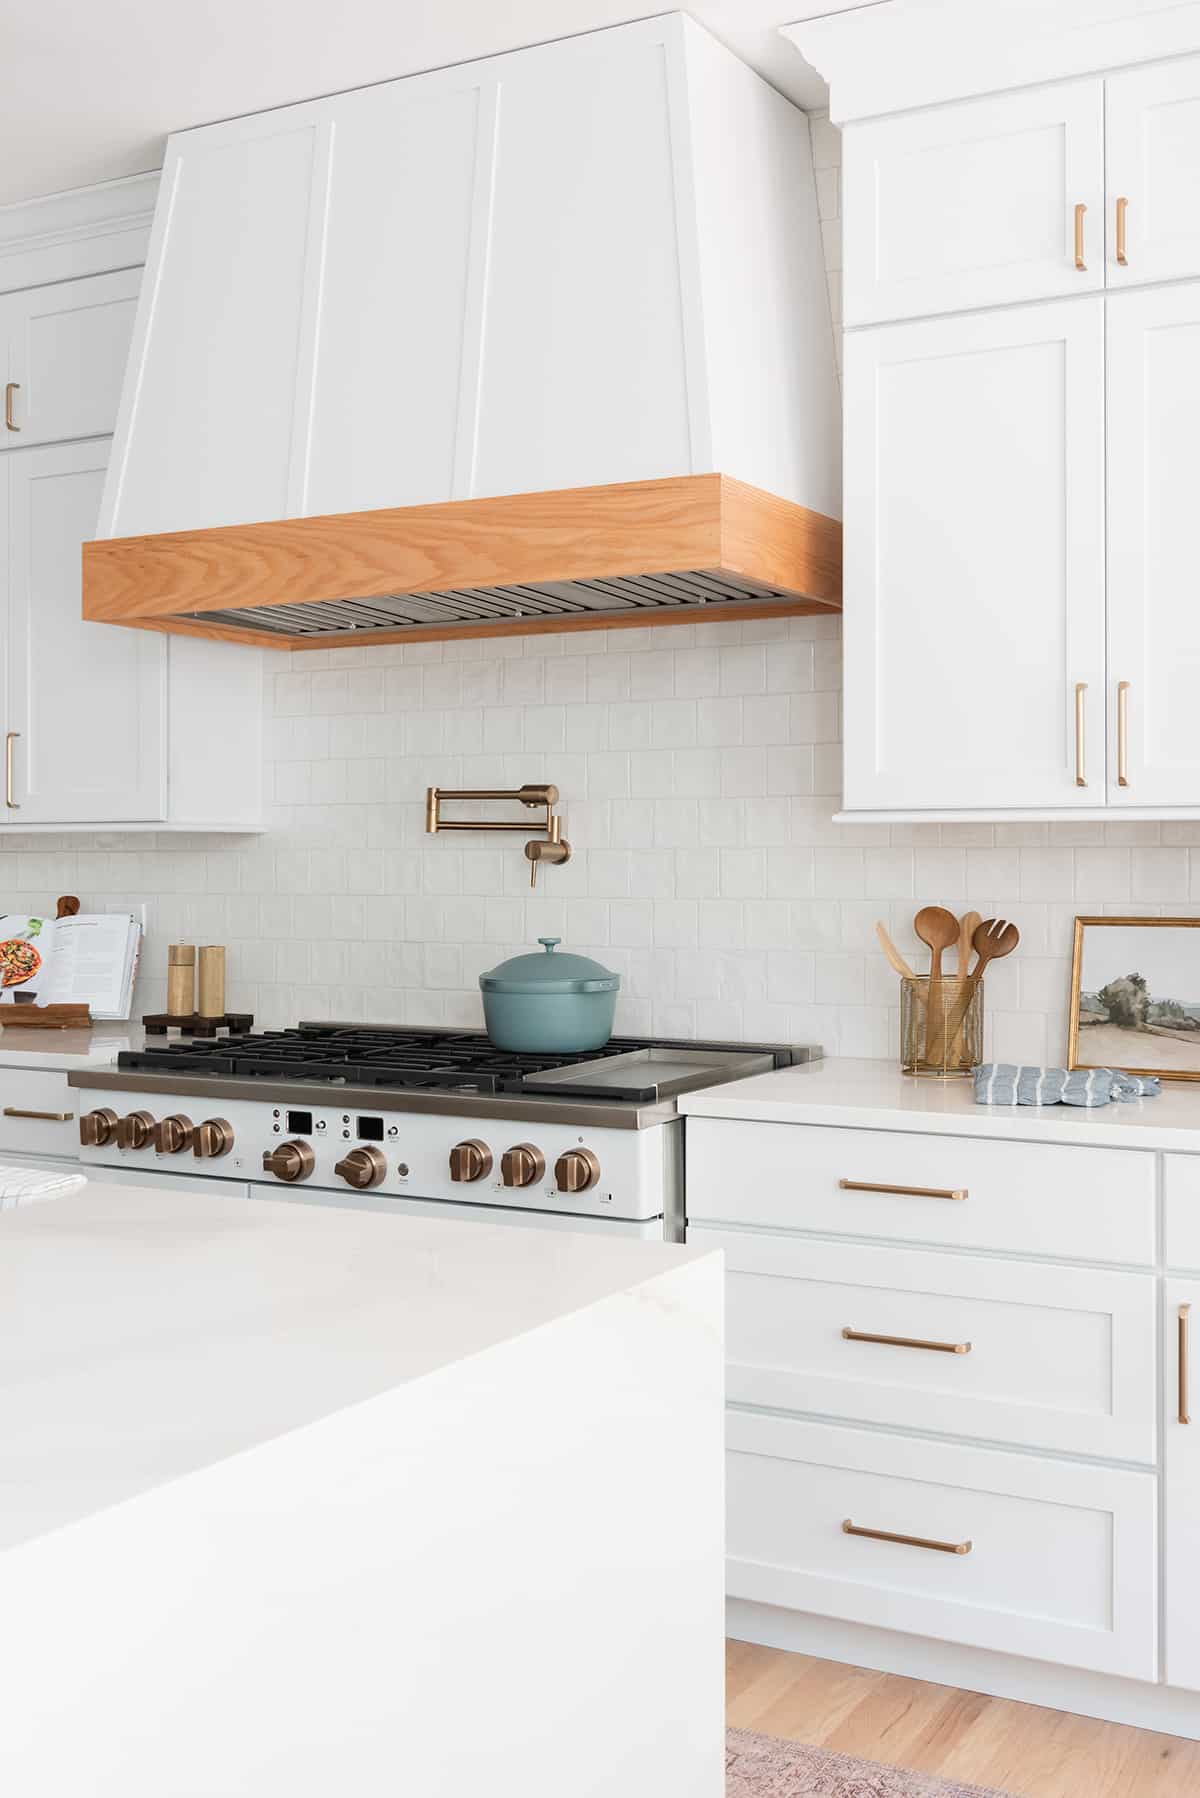
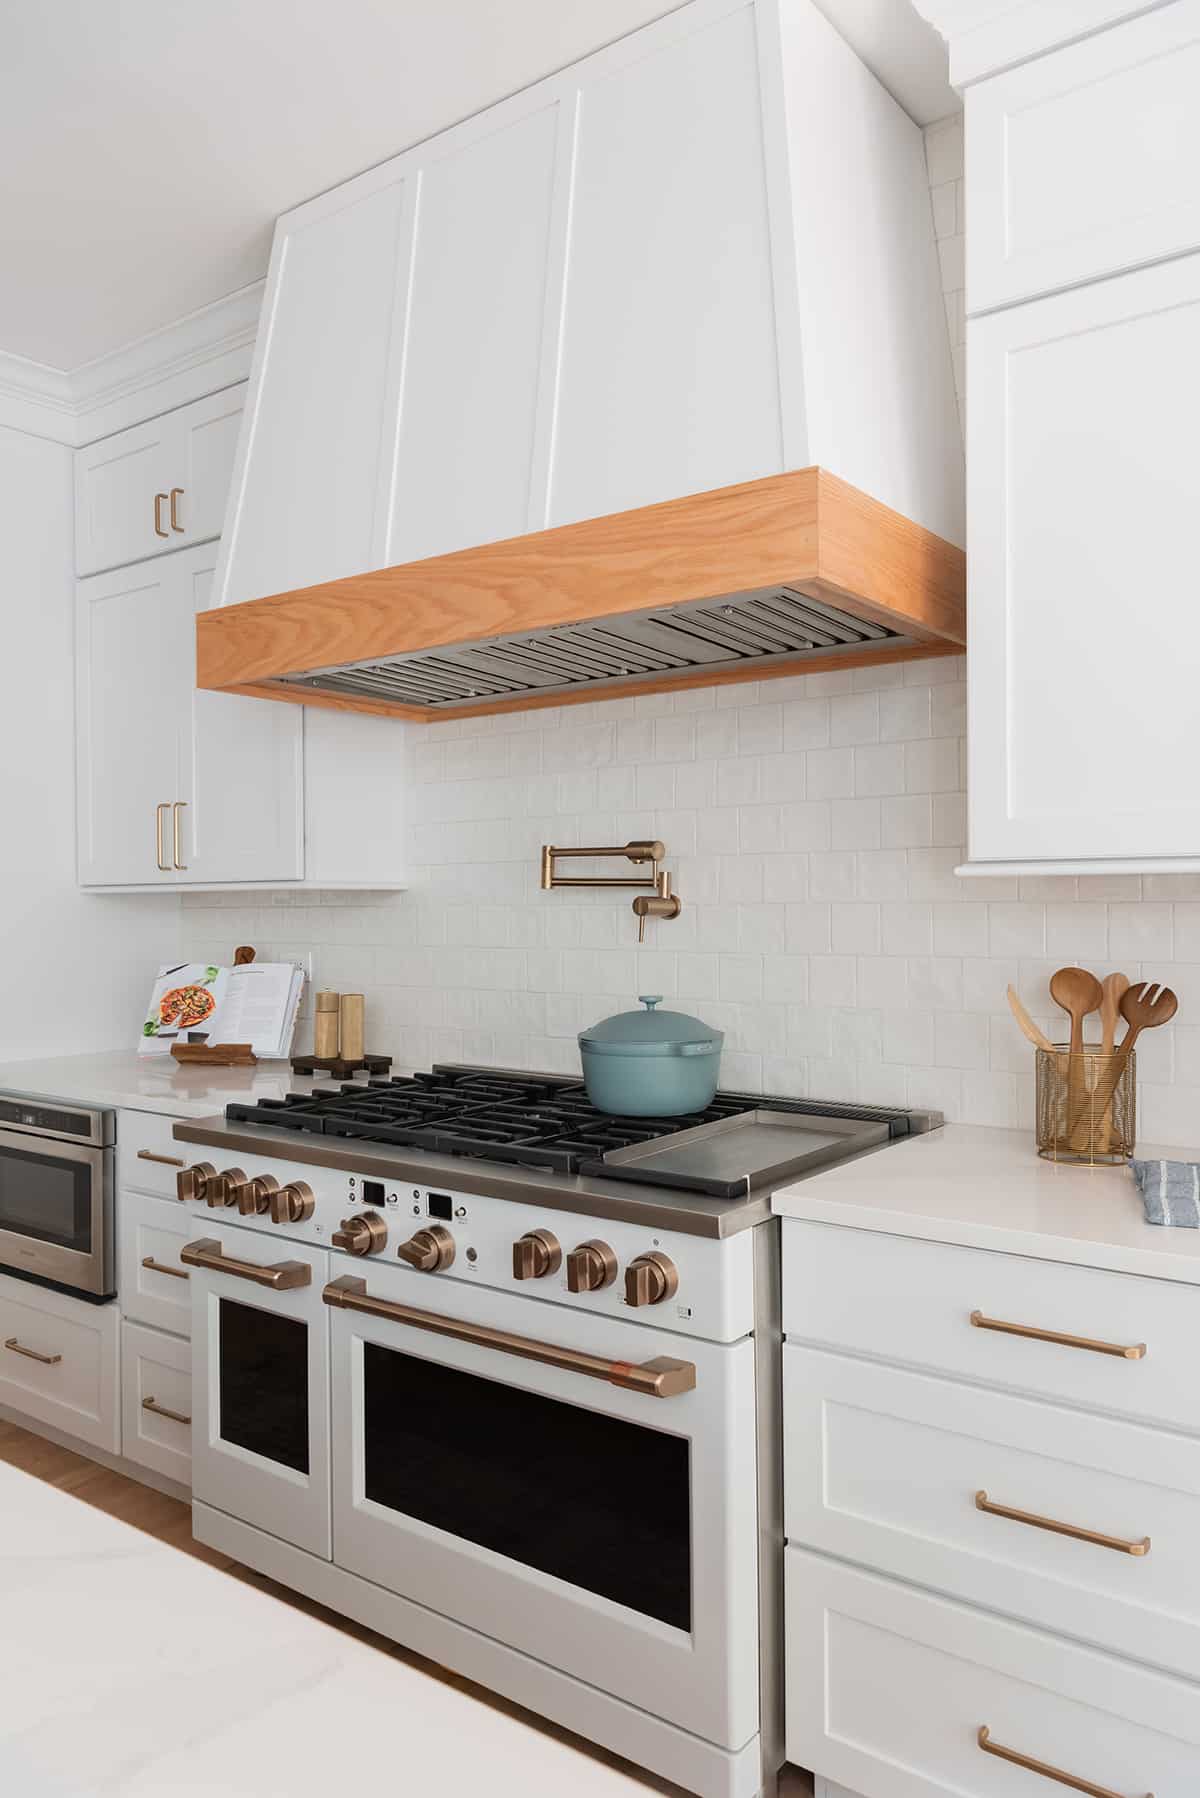
One of the most exciting aspects of our renovation was replacing all of our dated appliances. Right away I fell in love with GE Cafe series matte white appliances. Not only are the appliances visually stunning, but have high performance features that you’d find in a restaurant kitchen. I love cooking and the kitchen is the room where I spend the most time so a commercial-style gas range was a must. The range we selected has a ton of incredible bells and whistles: 4 types of versatile burners (6 total), a griddle and 2 ovens (one that’s catering size). After years of cooking on mini-sized electric apartment stovetops, I can’t believe that this is what I get to cook on everyday!

A really cool aspect of the GE Cafe line is that everything is customizable. Each appliance comes in multiple base colors and hardware finishes. We went with matte white for the base and brushed gold for the hardware for our stove, refrigerator and beverage center. SO pretty.
PS due to inventory we opted for a stainless steel finish on our dishwasher and a microwave drawer from the GE Monogram line (at the time when we ordered GE Cafe didn’t have a drawer-style microwave.)
TIP: If you’re planning to replace your appliances, make sure you check the lead times and order as far in advance of your demo as possible. We placed our order in November 2021 with a shipping estimate of March 2022. In January we found out that our ship date had been pushed back until mid-May 2022. Ultimately everything ended up arriving by mid-April 2022, right when we scheduled our demo.
full source list
Cabinets: Koch Classic Cabinets (white, full overlay)
Countertops + Waterfall Island: Silostone Quartz Eternal Calacatta – 3cm
Walls: Sherwin Williams Marshmallow (satin finish)
Island Cabinets: Koch Classic Cabinets (taupe)
Floors: natural red oak with clear, water-based finish
Cabinet + Drawer Pulls (we used a mix of sizes X)
Backsplash Tile: TileBar Montauk, Gin 4×4
Sink (truffle)
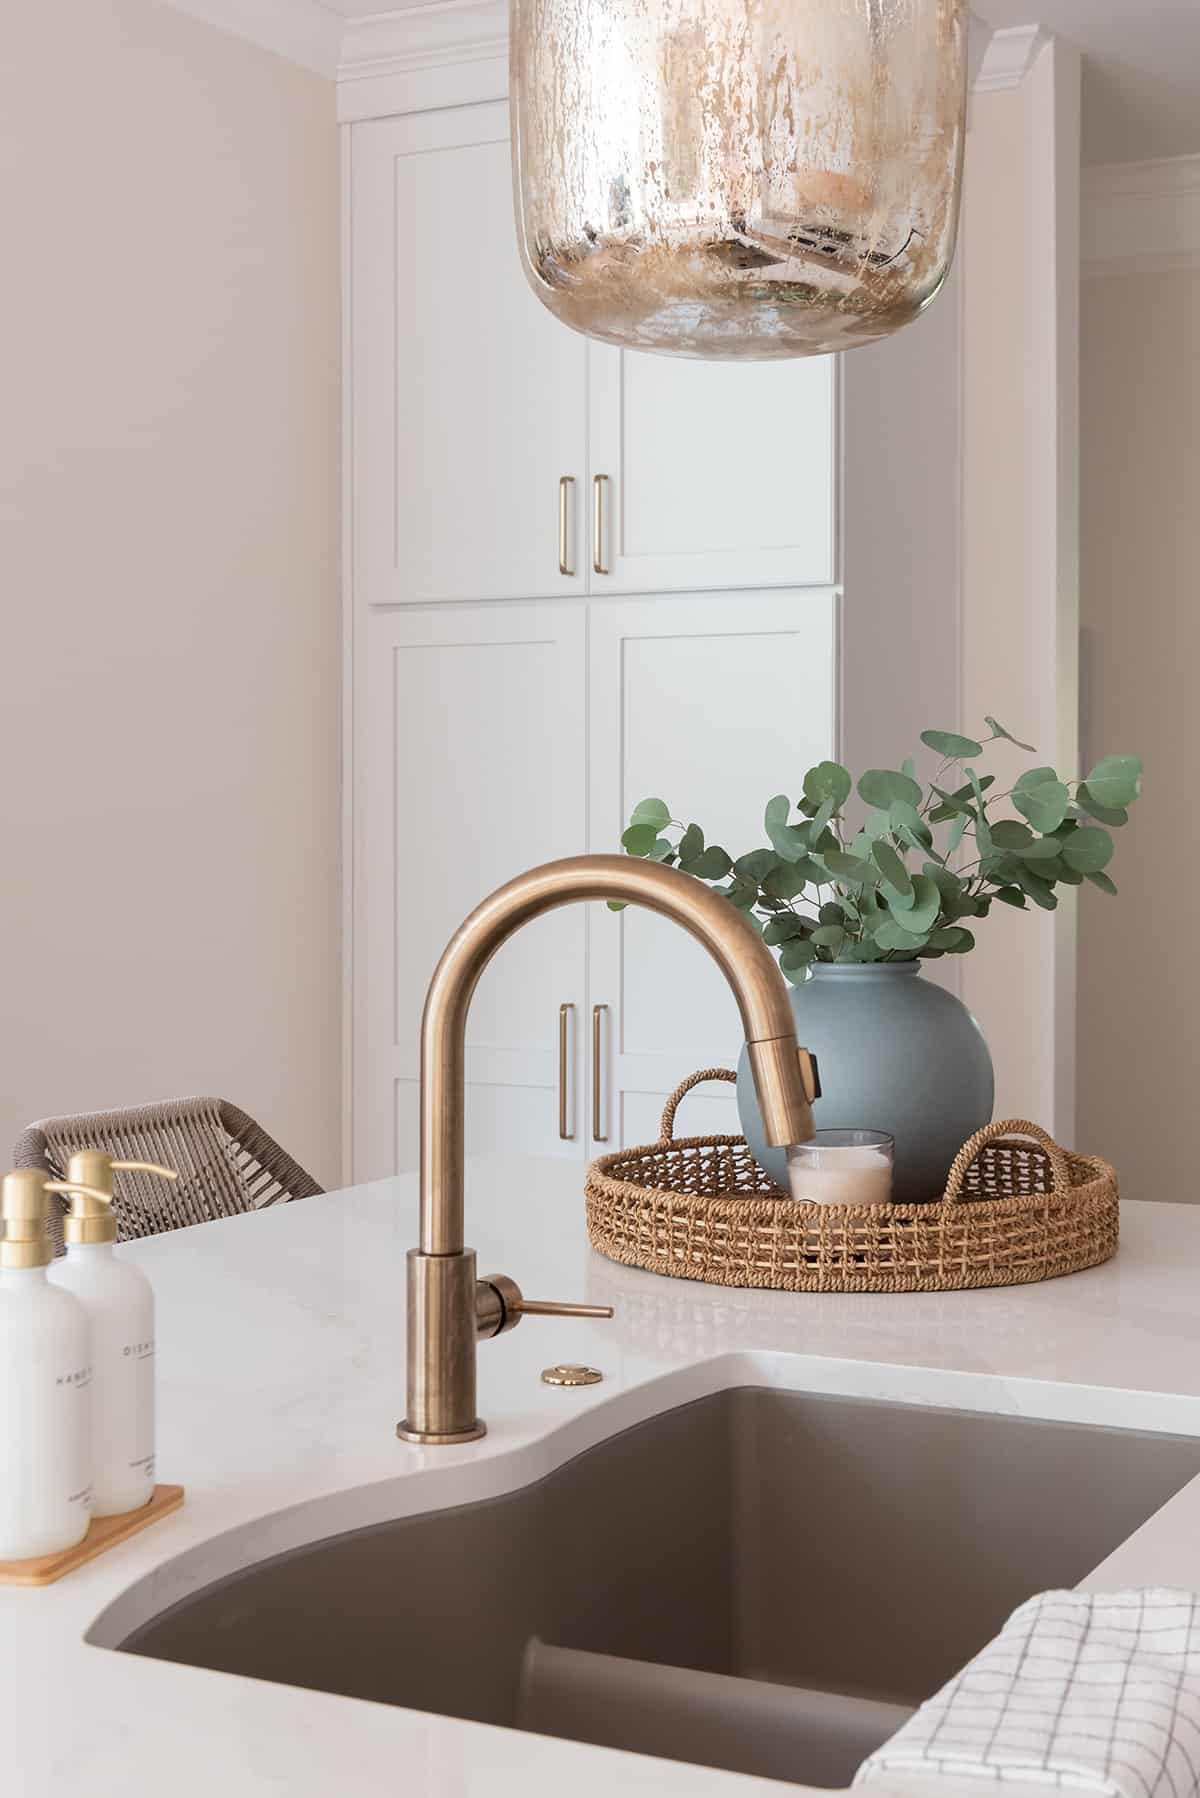
Faucet
Pot Filler
Garbage Disposal Air Switch (french gold)
Range Hood: custom via French’s Cabinet Gallery
Floating Shelves: custom via French’s Cabinet Gallery

Sink Faucet | Double Bowl Sink | Wall Mounted Pot Filler | Cabinet Hardware
appliances
Café 48” Smart Dual Fuel Commercial Style Range with Six Burners and Griddle
Monogram 1.2 Cu. Ft. Drawer Microwave
Café ENERGY STAR 18.6 Cu. Ft. Counter-Depth French Door Refrigerator
Café Smart Stainless Steel Interior Dishwasher with Sanitize and Ultra Wash & Dual Convection Ultra Dry
Café Beverage Center
Café Ice Maker with Nugget Ice
Trade-Wind 190 – 600 CFM 48 Inch Wide Insert Range Hood
lighting
Island Pendant Lights (medium)
Dining Area Chandelier
Wet Bar Sconces
Under Cabinet Lighting

furniture & decor:
Dining Area Table
Dining Area Bench + Sheepskin Cushion
Dining Area Chairs
Dining Area Rug
Counter Stools
Runner
Framed Countertop Art
Bar Tool Set
Cookbook/Tablet Holder
Salt + Pepper Shaker Pedestal
Blue Casserole Pot
White Hand + Dish Soap Bottles
vendors
Design: Katie Sneed Design
Contractor: OdubonLLC
Cabinets: French’s Cabinet Gallery
Floors: JM Hardwood Floors
Photography: Allison Elefante Photo


Laura says
So beautiful!! I really appreciate the details on timeline and budget. So often those details of the behind the scenes aren’t really shared. Congratulations on a stunning result!
Gloria Dobrota says
Beautiful renovations of your kitchen, plus the other areas. It makes your home so comfortable n enjoyable with your own touches.